Starting your own online store is an exciting step for any business owner. Shopify is one of the most popular e-commerce sites right now. The company made an impressive $8.88 billion in sales in 2024, which was about 26% more than the year before. There are over 5 million active Shopify stores in 2025.
Shopify product setup is easy, but if you’re new to the platform, adding your first product can be a little scary. In this post, we’ll show you how to set up products on Shopify step-by-step. This will help you add a product on Shopify in a way that will get you the most customers and sales.
Let’s get started and get you one step closer to your business dream!
Step 1: Log in to Your Shopify Admin Account
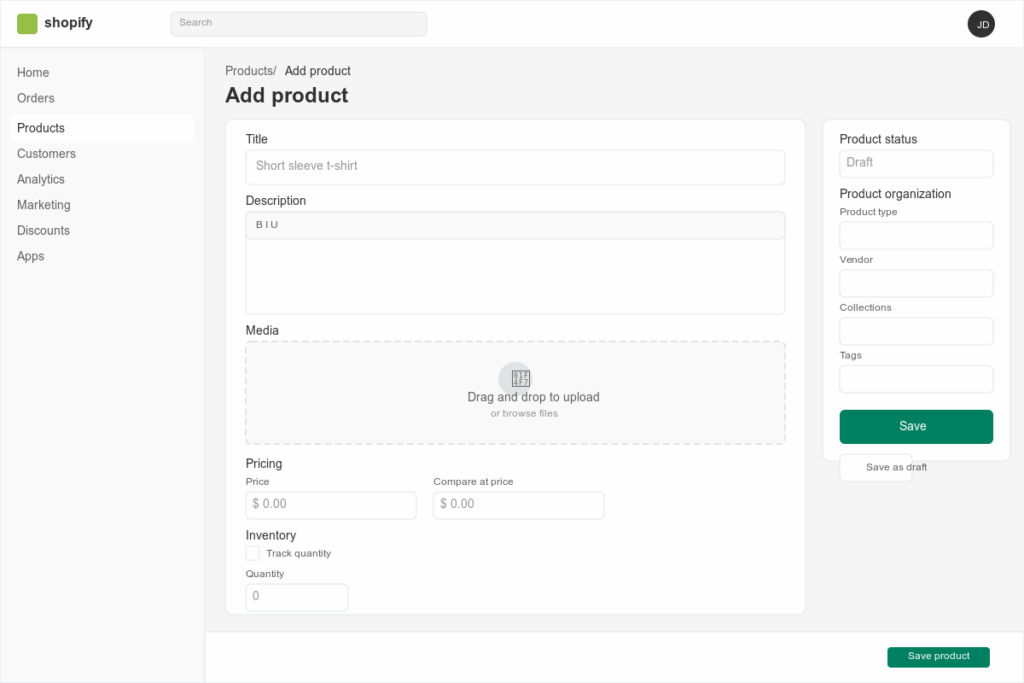
Log in to your Shopify account and head over to the Shopify dashboard. After accessing your admin panel, go to the Products section and click on “Add Product”. Now you are ready to enter all the information describing the product that you are going to sell. It’s essentially listing a product on Shopify.
Step 2: Add Product Title and Description
For the product title, always keep it simple and searchable. Think about how your potential customers will Google your product. What will be the first thing that pops into their heads? Use keywords with natural flow, but choose them wisely. For example, for a clothing business, you can choose words like “Men’s Summer T-Shirts”, “Cotton T-Shirts”, “Navy Blue Shirts”, and “Slim Fit T-Shirts”, etc.
For product description, keep it brief and to the point. Highlight your product’s main features and explain its benefits. There can be different concerns of potential buyers about your product; try to answer them in your product’s description. The following is an example of a good description:
“Our slim-fit T-shirts are made with 100% organic cotton. It is perfect for your everyday wear with its comfort and durability. Easy on your skin and kind to the planet!”
Try to write your description in bullet points with charts of size guides and instructions for washing and storing, etc.

Step 3: Add Images of Your Product
Spend some time taking good photos of your product. According to Shopify, the products with good photos are 3 times more likely to be purchased after viewing than the same products with bad photos. Make sure to take at least 3-5 images from different angles.
If possible, try to show the video or even pictures, showing the real-life use of your product. While taking the product photos, use consistent lighting and a background. Use supported photo formats like JPG, PNG, HEIC, and WebP.
Step 4: Set the Pricing and Cost
At this point, you need to enter three things to add a product to Shopify.
The first is “Price”, which is what the customer will pay for your product. The second is “Compare at Price”, which shows a markdown and is optional. The last one is “Cost Per Item”, which is a private field and shows what it costs you as a business owner. This later helps with profit calculations.
For example, if your shirts cost you $10 to make and you intend to sell them for 25$, then you will put “Price” as $25 and “Cost Per Item” as $10. Shopify also calculates your gross profits and margin so you can track your sales performance.
Learn in detail how to set up payments and taxes on Shopify.
Step 5: Inventory Settings
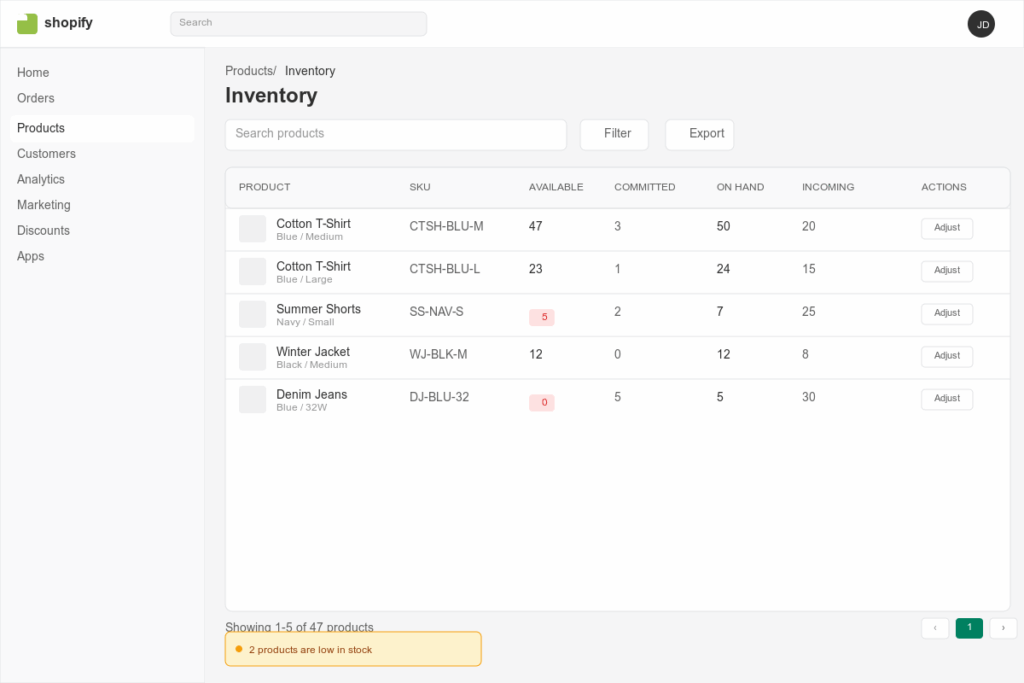
One of the key things for any business is managing the inventory. Even if you are just starting out, it is important to manage the inventory correctly from day one. Here you should fill in the following:
- SKU (Stock Keeping Unit): It is a unique product ID for your product
- Barcode: This is optional, but it can help you in tracking the POS
- Inventory Quantity: Tells you how many units you have left
- Enable “Track Quantity”: This will make Shopify stop selling your product automatically once you are out of stock
- Enable “Continue Selling When Out of Stock.” This will make Shopify continue to sell even if you are out of stock, but by accepting pre-orders
It makes total business sense to integrate your POS system with Shopify.

Step 6: Shipping and Delivery
If your product requires shipping, then check the “This is a physical product” option. Then add “weight,” which is used for calculating the shipping rates. In an optional field, you can enter your customer’s information if you are shipping internationally. It’s among the best practices of adding a product to Shopify.
Shopify is integrated with shipping partners like UPS, USPS, and DHL. This gives real-time delivery and shipping rates, and customers can take advantage of free shipping offers when they are live on Shopify.
Step 7: Product Variants
If your product has options like sizes or colors, then click on “Add variants”. For example, Option Name “size” and Values “S, M, L, XL”. You can also make a combination of variants for your product. Like for two sizes, S, M, and two colors, Black and White, you get 4 combinations: S/Black, S/White, M/Black, and M/White.
You can also add separate prices, stock quantities, and images for each variant. This helps you to diversify your product and offer multiple options to your customers.
Step 8: Search Engine Optimization (SEO)
Adding a product on Shopify can’t be complete without SEO. You can customize your page title, meta description, and URL/handle. Page title is 60-70 characters and includes your product’s keywords.
Meta description explains your product in 150-160 words. Keep your URL/handle short and infuse SEO optimized keywords. Around 43% of e-commerce traffic results from organic search, so SEO is key to the success of your business.
Step 9: Product Status and Sales Channels
Choose where your products are going to appear. Will it be on online stores, Facebook shop, Instagram, Shop App, or any custom sales channels? Then set your “Product Status” to either “Draft” if you are still editing your product or “Active” if you are ready to publish your product. At this point, if your theme supports it, then your product will go live instantly.
Step 10: Organize and Tag Your Products
Shopify product setup allows you to organize your products, which ensures that your store grows. For organizational purposes, Shopify allows you the following things:
- Collections: Assign your products to different collections like Summer Sale, Men’s wear, etc.
- Product Type: Add product type to help with filtering and sorting of products.
- Vendor: Add a vendor for useful drop-shipping.
- Tags: Use tags for promotions and filtering.
Advanced Tips—Dos and Don’ts for Adding Products on Shopify
The following are some of the dos and don’ts to maximize your product sales by correctly putting up your products on Shopify.
Do’s
- Use High-Quality Images: More than 90% of customers use visual cues for making an online purchase.
- Enable Customer Reviews: Makes new customers confident about buying, and products convert 3.5x more.
- Offer Discounts or Bundles: This adds to the average order value
- Paid Ad Campaign: Running paid ad campaigns on Facebook or Google Ads, etc., can drive traffic to your product
- Product Recommendations: Use Shopify’s built-in product recommendation feature to encourage cross-selling and upselling.
- Revisits and Updates: Revisit and update your listing with new information, pricing, inventory, or new features.
Don’ts
- Skip Product Description: Skipping this means Google won’t index you, and your customers won’t find the context.
- Use a single image: Lowers the confidence of your customers and hurts your sales.
- Ignore SEO: Poor or missing SEO translates directly into missing customers
- Lose Inventory Track: This leads to overselling, and without the inventory to back up, leads to negative customer reviews
- Use Vague Titles: Titles like “Men’s Navy Blue Cotton T-shirt” will attract more customers than “T-Shirt.”
Add a Shopify Product Today
If you are going to list a product on Shopify for the first time, it can be very daunting, but once you learn to do it correctly at least once, it becomes very easy. After adding your products with all the right tips and tricks mentioned above, you will be on your way to becoming a successful e-commerce business owner.
You will not only list a product on Shopify, but you will do it with compelling descriptions, good quality images, and SEO optimized keywords. This way, you will surely attract more potential customers, and your sales will improve massively.
Contact Objects today for the highest-quality professional Shopify development services. With our extensive portfolio of eCommerce projects, we are the best choice for online startups and enterprise retailers.


